Microsoft Word – Inserting Picture
Course - Microsoft Word
Published on 5 Dec 2020 at 04:67
Pictures Or Images (Inserting, Caption and Formatting) –
Picture always helps to register your message, and to speak loud without words. It also improve overall appearance of your documents. So it’s a good idea to add picture to your document if it’s needed to enhance important information.
To insert picture in your documents follow these step –
There are some simple steps to insert a picture in your document which is already saved in your computer as a file.
- Place your cursor (blinking bar) to the point where you want to insert the image.
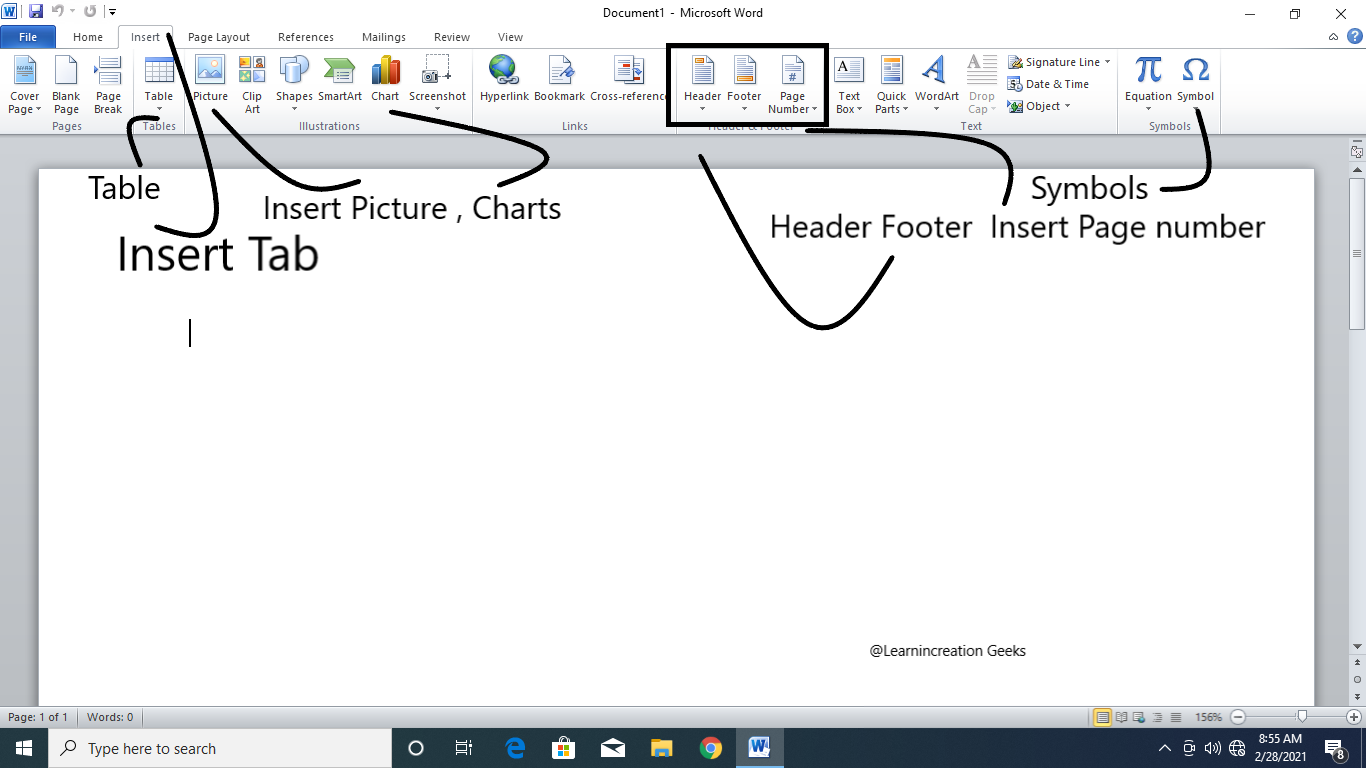
- Select the ‘Insert’ tab on Ribbon bar and click on ‘Pictures’ icon.
- A new dialog box is open to insert pictures. Select your desired pictured and click on “Insert” button.
- Images will be appear on your document.
- If your desired images is not in Pictures folders then search for your folder. In side bar navigation you will get many folder to search your image.
To resize your picture after inserting, click and drag on the corner sizing handles or to stretch it horizontally or vertically use side sizing handle.
Add caption to Images –
Adding a caption on images is a good practice it guide the reader that what he is looking at. There are some step to add caption on your picture or images –
- Select the picture or image.
- Click on ‘Reference’ then on “Insert Caption”.
- Click “New label”.
- Change the caption from Figure 1 (default caption) to your desired one by clicking on.
- After typing your caption click on “OK”. Caption will be added to your images. Formatting Pictures -
Formatting of picture is depend upon where you placed it how it used or what are the tools you are using to modify the images. You can crop it, or give a shape to an images or you can modify its border.
Let’s learn one by one.
Mainly cropping is done to remove undesired or unwanted part of an images which is not in used. Cropping is helpful when you want to focus on the required content of images not on unwanted one. There are some steps to crop the images –
- Select the images you want to crop.
- On selecting Format tab appears, click on it.
- Click on Crop command and cropping knob will appear around the images.
- Click, Hold and Drag a grip to crop the images.
- Once you adjust it click on “Crop” command again. The image will be cropped.
If you want to crop images in a shape then Word helps you to do this. Follow these steps to crop an image in shape –
- Select the image you want to crop.
- Click on “Format” tabs.
- Click on Crop drop-down button, click on “Crop to Shape”.
- Then selected your desired shape.
- The image will appear in a selected shape (circle in this case.)
You can also add border to your image in order to make it more attractive, follow are the step to add border in your picture –
- Select the image you want to add border and click on Format tab.
- Click on “Picture border”, a drop down menu bar will appear.
- Select the color, weight or dashes if you wish to add.
Message -
How are you?
So you learned to inserting images and to formatting it. Well, I have an idea create a documentary on any topic of your choice and insert images on it. Formatting it correctly and then submitted it to me. May be your document can inspire or empower someone through our medium.
Share Your Knowledge
A Campaign to Learn
If you know something well enough, share it with others.Mail us your own written article and we share it with other students, on our portal with your name !!
Read MoreIs this helpful ?
Give us your feedback, review or rate us so, we can improve ourself in order to gives you Best !!